How to add a custom menu to a WordPress Website?
WordPress menus are essential components of your website's navigation structure. They serve as the primary means for visitors to explore your site's content, guiding them through various pages and sections. A well-designed menu can significantly enhance user experience, improve site usability, and contribute to better search engine optimization (SEO).
Menus in WordPress are more than just links; they're customizable elements that allow you to create a hierarchical structure for your content. You can include pages, posts, custom links, and even categories in your menu. This flexibility enables you to craft a navigation system that perfectly suits your website's needs and your visitors' expectations.
The importance of a well-structured menu cannot be overstated. It helps reduce bounce rates by making it easy for users to find what they're looking for, improves site engagement by encouraging exploration, and can even boost your site's SEO by clearly defining the structure and hierarchy of your content for search engines.
Understanding WordPress Menus
Before diving into the steps, it’s important to understand what WordPress menus are. A menu is a collection of links that can point to different sections of your website, such as pages, posts, categories, or external URLs. Menus play a pivotal role in improving the user experience and guiding visitors through your site.
WordPress provides a built-in menu management system, making it easy to create, edit, and display menus without any coding knowledge. Depending on your theme, you may have multiple menu locations, such as the header, footer, or sidebar.
Preparing to Create Your Custom WordPress Menu
Before diving into the process of creating a custom menu, it's essential to plan and prepare. Start by outlining the structure of your website and determining which pages or sections are most important. Consider your target audience and what they're likely to be looking for when they visit your site.
Next, gather all the necessary elements you want to include in your menu. This might involve creating new pages, organizing your posts into categories, or preparing custom links to external resources. It's also a good idea to sketch out a rough draft of your menu structure, including any dropdown or nested menu items you plan to incorporate.
Lastly, familiarize yourself with your WordPress theme's menu locations. Most themes offer multiple menu positions, such as primary navigation, footer menus, or sidebar menus. Understanding these options will help you decide where to place your custom menu for maximum effectiveness.
Access the WordPress Dashboard
To get started, log in to your WordPress dashboard. The dashboard is where you can manage all aspects of your website, including menus. If you’re unsure how to access the dashboard, append “/wp-admin” to your website URL and enter your login credentials.
Navigate to the Menu Settings
Once inside the dashboard, follow these steps to access the menu settings:
- In the left-hand sidebar, locate and click on Appearance.
- From the dropdown menu, select Menus.
This action will take you to the Menu Editor, where you can create and manage custom menus.
Create a New Menu
To create a new menu:
- Click the Create a New Menu link at the top of the page.
- Enter a descriptive name for your menu in the provided text box. For example, you might name it “Main Navigation” or “Footer Links.”
- Click the Create Menu button to save your new menu.
Add Items to Your Menu
After creating your menu, you can add items to it. WordPress allows you to include pages, posts, custom links, and categories in your menu. To add items:
- Locate the Add Menu Items panel on the left side of the Menu Editor.
- Expand the section corresponding to the type of item you want to add (e.g., Pages, Posts, Custom Links, or Categories).
- Check the boxes next to the items you want to include in your menu.
- Click the Add to Menu button. The selected items will appear in the menu structure on the right.
Organize Your Menu
Once you’ve added items, you can arrange them to match your desired structure. WordPress provides a simple drag-and-drop interface for organizing menu items. To reorder items:
- Click and hold the item you want to move.
- Drag it to its new position within the menu structure.
- Release the mouse button to drop the item in place.
You can also create submenus by nesting items beneath a parent item. To do this, drag an item slightly to the right underneath another item.
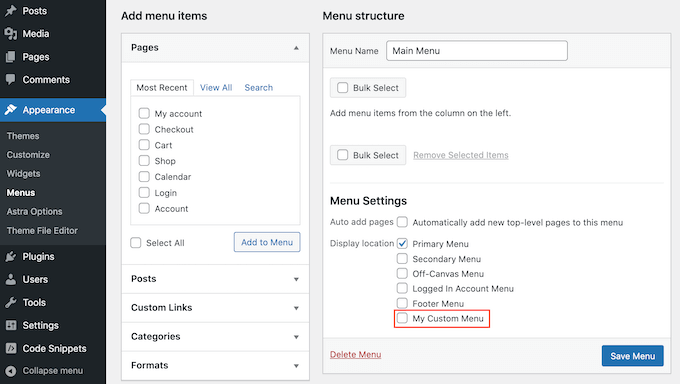
Assign the Menu to a Location
After building your menu, you need to assign it to a location on your website. Most WordPress themes offer predefined menu locations, such as the header, footer, or sidebar. To assign your menu:
- Scroll to the Menu Settings section below the menu structure.
- Check the box next to the desired location (e.g., Primary Menu, Footer Menu).
- Click the Save Menu button to apply your changes.
Customize the Menu Appearance
If you want to change the appearance of your menu, you can do so using your theme’s customization options or through custom CSS. To access the customization options:
- Navigate to Appearance > Customize in the WordPress dashboard.
- Click on Menus to view the menus available for customization.
- Select your menu and make changes to its styling, such as font size, color, and alignment, depending on your theme’s settings.
For advanced customization, you can add custom CSS by navigating to Appearance > Customize > Additional CSS.
Use Menu Plugins for Extended Functionality
If you need additional functionality beyond what WordPress provides by default, consider using a menu plugin. Plugins can help you create mega menus, add icons, or implement advanced styling. Some popular menu plugins include:
- Max Mega Menu: A powerful plugin for creating mega menus.
- WP Mobile Menu: Ideal for mobile-friendly navigation.
- Menu Icons by ThemeIsle: Adds icons to your menu items.
To install a plugin:
- Navigate to Plugins > Add New in the WordPress dashboard.
- Search for the plugin by name.
- Click Install Now and then Activate.
Follow the plugin’s documentation to configure and integrate it with your site.
Test Your Menu
Before finalizing your menu, test it to ensure it functions as intended. Visit your website and click through the menu items to verify they lead to the correct pages. Check the menu’s appearance on different devices to ensure it’s responsive and user-friendly.
Maintain and Update Your Menu
As your website evolves, your menu may need updates. Regularly review and update your menu to reflect new content, remove outdated links, and maintain a consistent user experience. To update your menu:
- Return to the Appearance > Menus section in the dashboard.
- Make the necessary changes.
- Save your updates.
Advanced WordPress Menu Techniques
For those looking to take their WordPress menus to the next level, there are several advanced techniques you can employ:
Mega Menus:
- Create expansive dropdown menus with multiple columns
- Use plugins like "Max Mega Menu" for advanced layouts
Dynamic Menus:
- Implement menus that change based on user roles or logged-in status
- Use conditional logic to show or hide specific menu items
AJAX-Powered Menus:
- Improve load times by using AJAX to load menu content dynamically
- Implement smooth transitions between pages without full page reloads
Multi-language Menus:
- If your site is multilingual, use plugins like WPML to create menus in different languages
- Ensure seamless navigation for international visitors
These advanced techniques can significantly enhance your site's navigation, providing a more engaging and personalized experience for your users.
Tips for Effective Menus
- Keep It Simple: Avoid overloading your menu with too many items. Focus on the most important links.
- Use Descriptive Labels: Use clear, concise labels that tell visitors exactly what to expect.
- Prioritize Key Pages: Place essential links, such as “Home” or “Contact,” in prominent positions.
- Test Responsiveness: Ensure your menu looks and functions well on all devices, including mobile phones and tablets.
Common WordPress Menu Errors and How to Fix Them
Even experienced WordPress users can encounter menu-related issues. Here are some common problems and their solutions:
Menu Not Appearing:
- Check if the menu is assigned to a location in the "Menu Settings"
- Verify that your theme supports the menu location you've chosen
Dropdown Menus Not Working:
- Ensure your theme supports multi-level menus
- Check for JavaScript conflicts that might be preventing dropdowns from functioning
Menu Items Disappearing:
- Increase the "Memory Limit" in your wp-config.php file
- Check for plugin conflicts that might be affecting menu functionality
Styling Issues:
- Use your browser's inspector tool to identify CSS conflicts -Add custom CSS to override problematic styles
Addressing these common issues, you can ensure your WordPress menu functions smoothly and provides a seamless navigation experience for your visitors.
WordPress Menu Plugins to Enhance Your Site Navigation
While WordPress offers robust built-in menu functionality, plugins can extend these capabilities even further. Here are some popular menu plugins to consider:
UberMenu:
- Creates advanced mega menus with multiple columns and rich content
- Offers extensive customization options for layout and design
Max Mega Menu:
- Transforms your existing WordPress menu into a feature-rich mega menu
- Provides a user-friendly interface for customization
Responsive Menu:
- Focuses on creating mobile-friendly menus
- Offers various mobile menu styles and animations
WP Sticky Menu:
- Makes your menu "stick" to the top of the page as users scroll
- Improves navigation accessibility on long pages
QuadMenu:
- Creates multi-purpose menus with drag-and-drop editing
- Supports mega menus, tabs, and carousel items
These plugins can help you create more dynamic and feature-rich menus, enhancing your site's navigation and user experience.
Mobile-Friendly WordPress Menus: Responsive Design Tips
In today's mobile-first world, ensuring your WordPress menu is responsive and mobile-friendly is crucial. Here are some tips to optimize your menu for mobile devices:
Implement a Mobile-Specific Menu:
- Create a simplified version of your main menu for mobile users
- Use a "hamburger" icon to toggle the mobile menu
Optimize Touch Targets:
- Ensure menu items are large enough to be easily tapped on small screens -Add adequate spacing between menu items to prevent accidental taps
Use Expandable Submenus:
- Implement accordion-style submenus that expand when tapped
- This saves space and improves navigation on smaller screens
Consider a Bottom Navigation Bar:
- For mobile sites, a fixed bottom navigation bar can improve usability
- Include only the most essential menu items in this bar
Test on Multiple Devices:
- Use tools like BrowserStack to test your menu on various mobile devices and screen sizes
- Ensure smooth functionality across different operating systems and browsers
Implementing these responsive design tips, you'll create a menu that provides an excellent navigation experience across all devices.
Measuring the Success of Your WordPress Menu: Analytics and User Feedback
To ensure your WordPress menu is effectively serving your visitors, it's important to measure its performance and gather user feedback. Here are some strategies to evaluate your menu's success:
Implement Click Tracking:
- Use tools like Google Analytics or Hotjar to track which menu items are clicked most frequently
- Identify underperforming menu items that may need repositioning or rewording
Analyze User Paths:
- Study the paths users take through your site
- Determine if your menu is guiding users to key pages effectively
Conduct User Surveys:
- Use plugins like WPForms to create user surveys
- Ask specific questions about the ease of navigation and menu usability
Monitor Bounce Rates:
- Check if certain pages have high bounce rates
- This could indicate that users are not finding what they expect from menu labels
Use Heatmaps:
- Implement heatmap tools to visualize how users interact with your menu
- Identify areas of high and low engagement
Regularly analyzing these metrics and gathering user feedback, you can continually refine and improve your WordPress menu for optimal performance.
FAQ
Q: How do I add a dropdown menu in WordPress?
A: To create a dropdown menu, drag a menu item slightly to the right under a parent item in the Menu Editor. This nests the item and creates a dropdown menu.
Q: Why is my menu not displaying on the website?
A: Ensure you have assigned the menu to a location in the Menu Settings section. Verify that your theme supports menus and check your theme’s documentation for menu-specific instructions.
Q: Can I add icons to my menu items?
A: Yes, you can use plugins like Menu Icons by ThemeIsle to add icons to your menu items. After installing the plugin, follow its instructions to configure icons.
Q: How do I make my menu mobile-friendly?
A: Use a responsive theme or a plugin like WP Mobile Menu to ensure your menu works well on mobile devices. Test your menu on various devices to confirm its functionality.
Q: Can I create multiple menus on one website?
A: Yes, you can create multiple menus and assign them to different locations, such as the header, footer, or sidebar, depending on your theme’s capabilities.
Useful References
- WordPress Menu User Guide: Official WordPress documentation on managing menus.
- How to Add Custom CSS in WordPress: Learn how to style your menus using custom CSS.
- Max Mega Menu Plugin Documentation: Comprehensive guide to using the Max Mega Menu plugin.
- WP Mobile Menu Plugin: Plugin page for creating mobile-friendly menus.
- Menu Icons by ThemeIsle: Official page for adding icons to your menus.
Conclusion
Creating a custom menu for your WordPress website is a powerful way to enhance user experience, improve navigation, and showcase your content effectively. By following the steps and best practices outlined in this guide, you can craft a menu that not only looks great but also serves as an intuitive roadmap for your visitors.
Remember that menu design is an ongoing process. As your site grows and evolves, so should your menu. Regularly review your analytics, gather user feedback, and make adjustments to ensure your menu continues to meet the needs of your audience.
Ready to take your WordPress menu to the next level? Start implementing these tips today and watch your site's navigation transform. If you need further assistance or want to explore advanced menu options, consider reaching out to a WordPress professional or exploring the plugins mentioned in this guide. Your perfect WordPress menu is just a few clicks away!
Investing time and effort into creating a thoughtful, user-friendly menu, you're not just improving navigation – you're enhancing the overall quality of your WordPress site. So go ahead, dive in, and start crafting the perfect menu for your website. Your visitors will thank you for it!