
How to create a WordPress staging website?
In the dynamic landscape of web development, ensuring the seamless operation of your WordPress site is crucial. One of the foundational elements in achieving this is the implementation of a staging environment. A staging environment acts as a testing ground, offering a risk-free platform to experiment and refine your website before any changes go live.
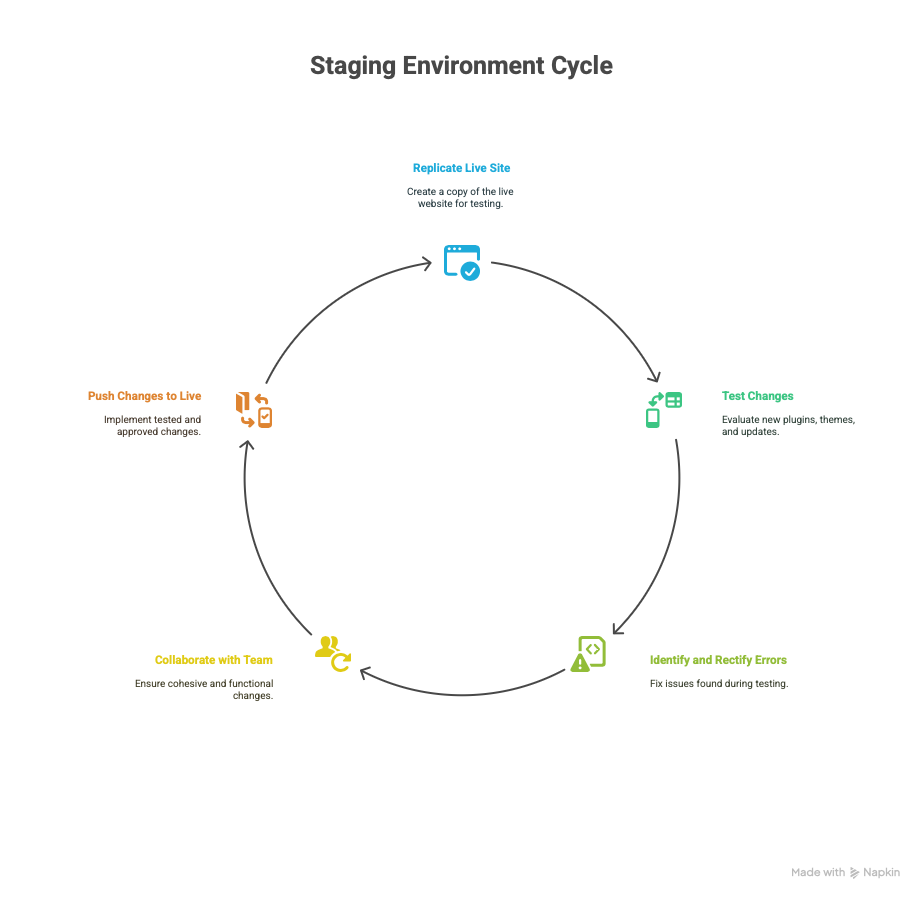
The primary advantage of a staging environment lies in its ability to replicate your live site. This duplication allows you to test new plugins, themes, and updates without impacting the user experience on your live site. Mistakes can be identified and rectified in the staging area, preventing potential disruptions that could lead to downtime or loss of data.
Moreover, staging environments enhance collaborative efforts among team members. Developers, designers, and content creators can work concurrently, ensuring that all changes are cohesive and functional before they are implemented on the main site. This methodical approach significantly reduces the likelihood of errors during updates or redesigns.
What is a Staging Environment?
A staging environment is a replica of your live site, hosted on a separate server or subdomain, where you can safely test changes and updates. It mirrors your production site closely, including its database and configurations, allowing you to assess how modifications will perform in a real-world setting.
This environment is invaluable for testing new features, themes, and plugins. By simulating real user interactions, you can identify potential issues and address them before they affect your live site. Staging environments also provide a controlled space to conduct performance testing and security assessments.
In essence, a staging environment acts as a buffer zone between development and deployment. It ensures that your live site remains stable and uninterrupted, offering a smoother experience for your visitors. By employing a staging site, you can maintain a high standard of quality and reliability for your WordPress website.
Benefits of Using a Separate Staging Environment
The benefits of a separate staging environment are manifold. Firstly, it enables thorough testing of updates and new features. By replicating the live site, you can evaluate changes in a controlled setting, minimizing the risk of breaking your site during updates.
Secondly, staging environments bolster site security. By testing security patches and updates in the staging area, you can ensure that they do not introduce vulnerabilities or conflicts with existing configurations. This preemptive approach helps safeguard your site against potential security breaches.
Lastly, a staging environment supports better project management and collaboration. It allows multiple team members to collaborate efficiently, testing and refining changes before they are pushed to the live site. This collaborative effort ensures that all modifications are vetted and approved, maintaining the integrity and functionality of your website.
Prerequisites for Creating a Staging Environment
Before you create a staging environment, there are several prerequisites to consider. Firstly, ensure that your hosting provider supports staging environments. Many managed WordPress hosts offer staging as part of their service packages, providing a simplified setup process.
Next, assess your current site’s configuration, including plugins, themes, and custom code. Understanding your site’s architecture will help you replicate it accurately in the staging environment. It’s also essential to have a backup of your live site, ensuring that no data is lost during the setup process.
Lastly, familiarize yourself with the tools and plugins available for creating staging environments. Popular options include WP Stagecoach, Flywheel, and Duplicator. These tools offer varied features and functionalities, so choose one that aligns with your specific requirements and budget.
Step-by-Step Guide to Creating a Staging Environment for Your WordPress Website
Creating a staging environment involves several steps. Here’s a detailed guide to help you set up a separate staging environment for your WordPress website:
- Choose a Hosting Provider: Select a hosting provider that supports staging environments. Managed WordPress hosts like WP Engine, SiteGround, and Bluehost offer one-click staging setups, simplifying the process.
- Create a Subdomain or Subdirectory: Set up a subdomain (e.g., ) or a subdirectory (e.g., ) for your staging site. This separates the staging environment from your live site.
- Clone Your Live Site: Use a plugin like Duplicator or WP Staging to clone your live site to the staging environment. These plugins facilitate the transfer of files and databases, ensuring an accurate replication.
- Test the Staging Site: Once your staging site is set up, test it thoroughly. Check for functionality, performance, and compatibility issues. Ensure that all plugins and themes work as expected and that there are no broken links or errors.
- Implement Changes: Make the necessary changes and updates in the staging environment. Test new features, plugins, and design elements to ensure they function correctly.
- Backup Your Live Site: Before pushing changes to the live site, create a backup. This precautionary step guarantees that you can restore your site in case of unforeseen issues.
- Push Changes to Live: Once you’re satisfied with the changes, deploy them to your live site. Many hosting providers and plugins offer easy deployment options, streamlining this process.
Advanced Developer Workflows: Git and CI/CD Integration
If you work in a team or deploy often, integrating Git and CI/CD can streamline your process.
Use Git for Version Control
-
Maintain repositories for your themes and plugins.
-
Track every change with commit messages.
-
Collaborate without overwriting each other’s work.
Connect a CI/CD Platform
-
Tools like GitHub Actions, Bitbucket Pipelines, and GitLab CI can automate deployments.
-
Set triggers for staging deployment on push.
Automated Testing
-
Run unit tests, visual regression tests, or integration tests during deployment.
-
Catch errors before they reach staging.
Containerized Environments
-
Use Docker to replicate exact environments.
-
Helps in maintaining consistency across development, staging, and production.
Use Case Example
An eCommerce startup using GitHub and WP Engine can automate deployments and quality assurance for every feature branch.
Common Tools and Plugins for Staging Sites
Several tools and plugins can assist in creating and managing staging environments. Here are some popular options:
WP Stagecoach: This plugin simplifies the staging process with one-click setup and deployment features. It’s user-friendly and ideal for non-technical users.
Duplicator: Known for its cloning capabilities, Duplicator allows you to create a backup of your site and transfer it to a staging environment seamlessly.
Flywheel: Flywheel is a managed WordPress host that offers built-in staging environments, making it easy to create and manage staging sites without additional plugins.
WP Engine: WP Engine provides robust staging features, including one-click setups and easy deployment options. It’s a preferred choice for many WordPress users.
These tools offer varying levels of functionality and ease of use. Choose one that meets your specific needs, considering factors like budget, technical expertise, and site complexity.
Testing Changes in the Staging Environment
Testing is a critical component of the staging process. In your staging environment, you can test various elements, including:
Code Changes: Test any custom code modifications to ensure they don’t introduce errors or conflicts with existing code.
Plugin Updates: Evaluate plugin updates to confirm they are compatible with your WordPress version and other plugins.
Theme Modifications: Test theme updates or changes to ensure they don’t affect the site’s layout, design, or functionality.
Performance Testing: Assess site speed and performance to identify potential bottlenecks or slow-loading elements.
Conducting comprehensive testing, you can identify and resolve issues before they impact your live site. This proactive approach ensures a seamless user experience and minimizes downtime.
How to Push Changes from Staging to Live
Once you’ve tested and approved changes in your staging environment, it’s time to push them to your live site. Here’s how to do it:
Backup Your Live Site: Always start by backing up your live site. This precaution ensures that you can restore it if anything goes wrong during the deployment process.
Review Changes: Double-check all changes and updates in the staging environment. Ensure that everything is functioning as expected and that no critical issues are present.
Deploy Changes: Use your hosting provider’s staging features or a plugin like Duplicator to deploy changes to the live site. Follow the instructions carefully to ensure a smooth transition.
Test the Live Site: After deployment, thoroughly test your live site to confirm that all changes have been implemented correctly. Check for functionality, performance, and content accuracy.
Following these steps, you can confidently push changes from your staging environment to your live site, maintaining the integrity and performance of your website.
Troubleshooting Common Issues in Staging Environments
Despite meticulous planning, issues can arise in staging environments. Here are some common problems and solutions:
Database Connection Errors: Ensure that your database credentials are correct and that the database server is accessible. Double-check your wp-config.php file for accurate settings.
Missing Files or Images: Verify that all site files and images have been transferred correctly. Use a plugin like Duplicator to re-clone the site if necessary.
Plugin Conflicts: Deactivate plugins one by one to identify conflicts. Once identified, consider alternative plugins or contact the plugin developer for support.
Performance Issues: Optimize your site for performance by caching, optimizing images, and minimizing scripts. Use tools like GTmetrix or Google PageSpeed Insights for analysis.
Addressing these common issues, you can ensure a stable and functional staging environment, facilitating a smooth transition to your live site.
Conclusion: Enhancing Your WordPress Workflow with a Staging Environment
Incorporating a staging environment into your WordPress workflow is a strategic move that enhances site management and development. By providing a controlled space to test changes, a staging environment minimizes risks and ensures your live site remains uninterrupted.
The benefits are clear: improved site reliability, enhanced security, and streamlined collaboration among team members. With the right tools and a methodical approach, you can efficiently create and manage a separate staging environment, bolstering the overall performance and success of your WordPress website.
As you embark on this journey, remember to leverage the power of staging environments to refine your site and elevate your digital presence. If you haven’t set up a staging environment yet, now is the time to take action. Enhance your WordPress workflow today, and enjoy the peace of mind that comes with a robust and reliable website. Ready to elevate your WordPress site with a dedicated staging environment? Start implementing these steps today and experience the benefits of a seamless, risk-free development process. Don’t wait until it’s too late—secure your website’s future with a reliable staging environment.
FAQ: How to create a WordPress staging website?
A staging site is hosted online and closely mirrors your live environment, making it ideal for final testing. A local development site runs on your computer, offering full control and faster workflows but lacking real-world server conditions.
Not if you configure it correctly. Always set your staging site to “noindex” using an SEO plugin or robots.txt, and restrict access via HTTP authentication to prevent search engines from crawling it.
Yes, you should mirror all plugins, themes, and settings from your live site to ensure an accurate testing environment. This ensures that any changes you test reflect what will happen in production.
Update your staging environment whenever you plan to make significant changes, such as plugin/theme updates, code customizations, or new feature testing. Also refresh it periodically to stay in sync with your live site.
No. Always protect your staging site using password protection (.htaccess), HTTP authentication, or IP whitelisting. Exposing it publicly can lead to SEO issues or data breaches.
restore the backup or roll back using a backup plugin or your host’s recovery tool.
Yes. Some plugins like WP Staging Pro and platforms with CI/CD integration (like GitHub Actions) allow automated or semi-automated deployments. Always validate changes manually before deploying automatically.
Only during the cloning or push process. Once the staging site is created, it runs separately and doesn't affect your live site's performance unless server resources are extremely limited.
When pushing changes, use tools that include database synchronization. For manual workflows, always export and import your database carefully and use search-replace tools to update URLs and paths.
Absolutely. However, for eCommerce sites, avoid pushing user or order data from staging to live, as this can overwrite live transactions. Focus on syncing code and design, not transactional data.
Useful References
-
WordPress.org – Moving WordPress https://wordpress.org/support/article/moving-wordpress/
Official documentation on manually migrating WordPress sites, essential for manual staging setup.
-
WP Staging Plugin Documentation https://wp-staging.com/docs/
In-depth guides and support articles for using WP Staging for cloning and pushing changes.
-
Duplicator Plugin Knowledge Base https://snapcreek.com/duplicator/docs/
Detailed instructions on using Duplicator for staging and migration purposes.
-
BlogVault Documentation https://blogvault.net/docs/
Covers how to use BlogVault for staging, backups, and security.
-
SiteGround Staging Feature Guide https://www.siteground.com/kb/how_to_use_the_staging_tool/
Example of a hosting provider’s one-click staging solution.
-
WP Engine – Staging Environment Overview https://wpengine.com/support/staging-environment/
Guide on WP Engine’s built-in staging tools, including best practices.
-
Yoast SEO – How to Block a Staging Site from Search Engines https://yoast.com/prevent-staging-site-indexing/
Explains how to ensure your staging site remains private and unindexed.
-
GitHub Actions Documentation https://docs.github.com/en/actions
For developers integrating Git-based CI/CD pipelines into staging workflows.
-
Better Search Replace Plugin Guide https://wordpress.org/plugins/better-search-replace/
Tool for updating URLs in a cloned staging database after migration.
-
WordPress.org – Hardening WordPress https://wordpress.org/support/article/hardening-wordpress/
Recommendations for securing your staging (and live) environments.


